
There is a Linux-based approach to working with GPIO lines and serial buses that is worth knowing about because it provides an alternative to using the bcm2835 library. Sometimes you need this because you are working in a language for which direct access to memory isn't available. It is also the only way to make interrupts available in a C program.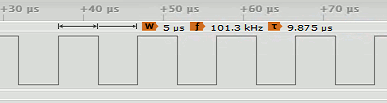
Now On Sale!
You can now buy a print or ebook edition of Raspberry Pi IoT in C from Amazon.
For Errata and Listings Visit: IO Press

This our ebook on using the Raspberry Pi to implement IoT devices using the C programming language. The full contents can be seen below. Notice this is a first draft and a work in progress.
Chapter List
-
Introducing Pi (paper book only)
-
Getting Started With NetBeans In this chapter we look at why C is a good language to work in when you are creating programs for the IoT and how to get started using NetBeans. Of course this is where Hello C World makes an appearance.
-
First Steps With The GPIO
The bcm2835C library is the easiest way to get in touch with the Pi's GPIO lines. In this chapter we take a look at the basic operations involved in using the GPIO lines with an emphasis on output. How fast can you change a GPIO line, how do you generate pulses of a given duration and how can you change multiple lines in sync with each other? -
GPIO The SYSFS Way
There is a Linux-based approach to working with GPIO lines and serial buses that is worth knowing about because it provides an alternative to using the bcm2835 library. Sometimes you need this because you are working in a language for which direct access to memory isn't available. It is also the only way to make interrupts available in a C program. -
Input and Interrupts
There is no doubt that input is more difficult than output. When you need to drive a line high or low you are in command of when it happens but input is in the hands of the outside world. If your program isn't ready to read the input or if it reads it at the wrong time then things just don't work. What is worse is that you have no idea what your program was doing relative to the event you are trying to capture - welcome to the world of input. -
Memory Mapped I/O
The bcm2835 library uses direct memory access to the GPIO and other peripherals. In this chapter we look at how this works. You don't need to know this but if you need to modify the library or access features that the library doesn't expose this is the way to go. -
Near Realtime Linux
You can write real time programs using standard Linux as long as you know how to control scheduling. In fact it turns out to be relatively easy and it enables the Raspberry Pi to do things you might not think it capable of. There are also some surprising differences between the one and quad core Pis that make you think again about real time Linux programming. -
PWM
One way around the problem of getting a fast response from a microcontroller is to move the problem away from the processor. In the case of the Pi's processor there are some builtin devices that can use GPIO lines to implement protocols without the CPU being involved. In this chapter we take a close look at pulse width modulation PWM including, sound, driving LEDs and servos. -
I2C Temperature Measurement
The I2C bus is one of the most useful ways of connecting moderately sophisticated sensors and peripherals to the any processor. The only problem is that it can seem like a nightmare confusion of hardware, low level interaction and high level software. There are few general introductions to the subject because at first sight every I2C device is different, but here we present one. -
A Custom Protocol - The DHT11/22
In this chapter we make use of all of the ideas introduced in earlier chapters to create a raw interface with the low cost DHT11/22 temperature and humidity sensor. It is an exercise in implementing a custom protocol directly in C. -
One Wire Bus Basics
The Raspberry Pi is fast enough to be used to directly interface to 1-Wire bus without the need for drivers. The advantages of programming our own 1-wire bus protocol is that it doesn't depend on the uncertainties of a Linux driver. -
iButtons
If you haven't discovered iButtons then you are going to find of lots of uses for them. At its simples an iButton is an electronic key providing a unique coce stored in its ROM which can be used to unlock or simply record the presence of a particular button. What is good news is that they are easy to interface to a Pi. -
The DS18B20
Using the software developed in previous chapters we show how to connect and use the very popular DS18B20 temperature sensor without the need for external drivers. -
The Multidrop 1-wire bus
Some times it it just easier from the point of view of hardware to connect a set of 1-wire devices to the same GPIO line but this makes the software more complex. Find out how to discover what devices are present on a multi-drop bus and how to select the one you want to work with. -
SPI Bus
The SPI bus can be something of a problem because it doesn't have a well defined standard that every device conforms to. Even so if you only want to work with one specific device it is usually easy to find a configuration that works - as long as you understand what the possibilities are. -
SPI MCP3008/4 AtoD (paper book only)
-
Serial (paper book only)
-
Getting On The Web - After All It Is The IoT (paper book only)
-
WiFi (paper book only)
Having Linux on a system that is being used for real time control is quite different to the situation with most microcontrollers where nothing gets between your code and the hardware. The sophistication of Linux is a great advantage when it comes to interfacing with complex hardware such as WiFi but it is as distinct disadvantage when it comes to interfacing with simple fast hardware like the GPIO. Put simply you have to learn to do things in a way that Linux finds natural even if this seems strange and convoluted to you as a microcontroller programmer.
Take for example GPIO access - how can this be made available to the general programmer in a way that is natural to Linux? You can't simply allow direct memory access to the hardware because this cuts across Linux's control of memory allocation and security. You have to find something that Linux already supports in a general way to map the GPIO access on to.
A key principle of Linux is that everything is a file or a folder. As much as is possible Linux deals with external hardware by treating it as if it was a file system. This is reasonable because external hardware either wants to receive data as commands or something to store or display or it want to send data as responses or user input. So most hardware interacts with Linux as a source or a sink of data and this is exactly what a file is all about.
This "everything is a file" approach only really fails when issues of performance enter the picture.
Accessing a piece of hardware as if it was a file when it isn't can be slow. In normal use direct memory access is much faster and it is what the bcm2835 library is all about. We look at how this works in more detail in a later chapter.
So file-based access to the hardware can be slow, but it has the huge advantage that it is language-independent. Every language has the facilities needed to open, read/write and close a file and so has the facilities needed to work with hardware via the file system.
It also has the advantage that it works with Linux rather than just ignoring it. The system knows about files and understands how to work with them. This allows it to offer advanced features like interrupts to GPIO users that fit in with the way other Linux interrupts work. More of this in the next chapter.
It may seem crazy to you, especially if you know how the underlying hardware works, to treat a single GPIO line as it if was a file but it works. Files are a fundamental data type in Linux and a GPIO line is something you read from or write too just like a file. From the Linux point of view it makes perfect sense.
The big problem is that the details of how hardware is represented as a file system is poorly documented and you have to find out about it by guessing, trial and error, reverse engineering, or by reading code the makes use of it.
Working with Sysfs
Sysfs is a virtual file system that provides all sorts of access to hardware and the operation of the Linux kernel. You can spend a lot of time exploring Sysfs, but the only part we are particularly interested in is the gpio folder. Sysfs is usually mounted in the sys folder and the folder that corresponds to the gpio device is usually:
/sys/class/gpio
To see what is in the folder, simply list it:
ls /sys/class/gpio

The list includes the gpio lines that are already in use by some process or other. Notice that the gpio numbers are not external pin numbers, but internal GPIO numbers. So for example to use the GPIO line that is on physical pin 7 on the connector you need to refer to GPIO 4.
The steps in using a line are always the same:
- Reserve or "export" the gpio line so that no other process can use it
- Set its direction and read or write it
- Unreserve it or unexport it
You can do these steps from any language that supports file operations including the shell.
You might ask why you have to "export" or reserve a GPIO line rather than just use it?
The answer is that the export operation will only work if the OS hasn't claimed the GPIO line for its own use or some other process hasn't claimed it. You can think of the export/unexport process as making sure that you don't misuse GPIO lines and that you don't share them with other processes.
To reserve a gpio line you have to write its number to the export folder and you can do this using the shell command. For example, assuming we want to work with gpio-44:
echo 4 > /sys/class/gpio/export
You can of course change 4 to any valid gpio number.
You can do the same job in C:
#include <stdio.h> #include <string.h>int main(int argc, char** argv) { int gpio = 4; FILE* fd = fopen("/sys/class/gpio/export", "w"); fprintf(fd, "%d", gpio); fclose(fd); return 0; }
If you are not familiar with C file operations - the fopen function opens export for write, the fprintf string prints the number of the gpio line and then the file is closed.
Once you have the pin reserved you will see a new folder gpio4 corresponding to it in /sys/class/gpio.
Now that you have it reserved, you can set its direction and read or write it. To do you have to read or write to the appropriate sub folder of the new gpio folder, direction or value. If you list all of the folders in gpio4 you will see

Each of these folders controls some aspect of the GPIO lines functioning. The most important of these are
direction - set to in or out
and
value - set to 0 or 1 and read 0 or 1 for input.
There is also active_low which determines which way the logic operates. It determines is the line low corresponds to a one or a zero.
For example, to read the line from the command line use:
echo "in" > /sys/class/gpio/gpio4/direction
cat /sys/class/gpio/gpio4/value
and to set the line high and then low:
echo "out" > /sys/class/gpio/gpio4/direction

echo 1 > /sys/class/gpio/gpio4/value
echo 0 > /sys/class/gpio/gpio4/value
You can do the same things using C but it is slightly more verbose due to the need to open and close files and build the appropriate strings.
Example - Toggling a line
As an example consider the following C program which sets gpio-4 to output and then toggles it high and low as fast as possible:
#include <stdio.h>
#include <string.h>

int main(int argc, char** argv) {
    int gpio = 4;
    char buf[100];

    FILE* fd = fopen("/sys/class/gpio/export", "w");
    fprintf(fd, "%d", gpio);
    fclose(fd);

    sprintf(buf, "/sys/class/gpio/gpio%d/direction", gpio);
    fd = fopen(buf, "w");
    fprintf(fd, "out");
    fclose(fd);

    sprintf(buf, "/sys/class/gpio/gpio%d/value", gpio);
    fd = fopen(buf, "w");

    for (;;) {
        fd = fopen(buf, "w");
        fprintf(fd, "1");
        fclose(fd);
        fd = fopen(buf, "w");
        fprintf(fd, "0");
        fclose(fd);
    }
    return 0;
}
The program first exports gpio4 and then writes "out" to its direction folder to set the line to output. After this the value file is open for writing and "1" and "0" are written to the file repeatedly.
Notice the "clever" use of sprintf to create strings which incorporate the number of the gpio line you are using so that you can open the correct folder.
You might be puzzled by the loop that opens the file, writes a value and then closes it. Why not just keep the file open? The reason is that the file buffer isn't flushed unless the file is closed. This is the usually way of dealing with the problem but there is a better way.
It you try this this out you will discover that the pulse train has a frequency of around 2KHz on a Pi 2/Zero and a pulse width of 200 microseconds.

This is not very fast and it is part of the reason that SYSFS has a bad reputation.
However we can do much better than this by not closing the file every time we write to it. Instead we can use fflush to flush the file buffer:
If you change the for loop to:
 for (;;) {
        fprintf(fd, "1");
        fflush(fd);
        fprintf(fd, "0");
        fflush(fd);
    }
the different is quite amazing.
Now the frequency is 100kHz and the pulse width is 5 microseconds which is still about 10 time slower than using the library and direct memory access.
The point is that opening and closing files is expensive but reading and writing isn't. If you are using SYSFS then it is worth keeping files open which is not what most of the example SYSFS programs do. They tend to provide a function that writes to the GPIO line by first opening the file, writing to it and then closing it. Of course when you use a function to write to the GPIO line you generally don't notice the repeated opening and closing of the file.
It is tempting to try to write a general purpose SYSFS GPIO access library but in practice it is quite difficult to organize things so that files are opened and closed at reasonable times without making the whole thing inefficient. You can either opt to keep track of what files are open and hence avoid reopening them or you can test to see it files are open before working with them. The first is efficient and complicated the second is slow but simple.
A Simple Fast SYSFS System
It is possible to create a simple fast SYSFS GPIO system. All you have to do is abandon the need to follow the underlying structure - don't create an export, direction, value file handling functions but concentrate on the GPIO lines. All you really need is an openGPIO function that gets a single GPIO line ready for use either as an input or an output. The trick to keeping things fast is to open the value file and keep it open until another call to openGPIO causes it to change direction.
To do this for all the GPIO lines we need to keep track of the files that are open using an array of file descriptors:
FILE fd[32] = {};
Now we have one file descriptor per GPIO line. The open function only needs the gpio number and the direction we want to open it in:
int openGPIO(int gpio, int direction) {
    if (gpio < 0 || gpio > 31) return -1;
    if (direction < 0 || direction > 1)return -2;
Next we have to check to see if the file descriptor is non-null. If it is the GPIO line is already in use and we have to close the file and unexport it:
   int len;
   char buf[BUFFER_MAX];

    if (fd[gpio] != NULL) {
        close(fd[gpio]);
        fd[gpio] = open("/sys/class/gpio/unexport", O_WRONLY);
        len = snprintf(buf, BUFFER_MAX, "%d", gpio);
        write(fd[gpio], buf, len);
        close(fd[gpio]);
    }
We can now export the GPIO line and set the direction specified and finally open the value file:
 fd[gpio] = open("/sys/class/gpio/export", O_WRONLY);
    len = snprintf(buf, BUFFER_MAX, "%d", gpio);
    write(fd[gpio], buf, len);
    close(fd[gpio]);

    len = snprintf(buf, BUFFER_MAX, "/sys/class/gpio/gpio%d/direction", gpio);
    fd[gpio] = open(buf, O_WRONLY);
    if (direction == 1) {
        write(fd[gpio], "out", 4);
        close(fd[gpio]);
        len = snprintf(buf, BUFFER_MAX, "/sys/class/gpio/gpio%d/value", gpio);
        fd[gpio] = open(buf, O_WRONLY);

    } else {
        write(fd[gpio], "in", 3);
        close(fd[gpio]);
        len = snprintf(buf, BUFFER_MAX, "/sys/class/gpio/gpio%d/value", gpio);
        fd[gpio] = open(buf, O_RDONLY);
    }
    return 0;
}
Notice that if you are planning to use this in production you need to add error handling to the file opens and writes.
At the end of the openGPIO function the line's file descriptor is set to the value file ready to read or write so a write function is simply:
int writeGPIO(int gpio, int b) {
    if (b == 0) {
        write(fd[gpio], "0", 1);
    } else {
        write(fd[gpio], "1", 1);
    }

    lseek(fd[gpio], 0, SEEK_SET);
    return 0;
}
Notice that there are no error checks in this function to keep it fast. It is up to the user to make sure that the GPIO line has been opened and in the correct direction. If you want to add checks they are easy enough but they do slow things down.
Using a main program something like:
#include <stdio.h>
#include <string.h>
#include <fcntl.h>
#include <unistd.h>


#define BUFFER_MAX 50
FILE *fd[32] = {};

int openGPIO(int pin, int direction);
int writeGPIO(int gpio, char value);

int main(int argc, char** argv) {
    openGPIO(4, 1);
    for (;;) {
        writeGPIO(4, 1);
        writeGPIO(4, 0);
    }
    return 0;
}
The speed is almost the same as the raw write loop - 3.5 microsecond pulses.
A read function is just as easy and simple:
int readGPIO(int gpio) {
    char value_str[3];
    int c = read(fd[gpio], value_str, 3);
    lseek(fd[gpio], 0, SEEK_SET);

    if (value_str[0] == '0') {
        return 0;
    } else {
        return 1;
    }

}
This function is used in the next chapter so look there for an example.
Conclusion
So is SYSFS worth using?
From C probably not for general use. You have all the GPIO control you need using the bcm library. What is more there are missing features from the SYSFS facilities. For example there seems to be no way to control the pin modes - pull up etc. and no way to select drive strength.
However it is worth noting that SYSFS isn't as slow as it is usually painted and it can be useful in languages that don't have direct access to the GPIO registers.
Finally there is one important area where SYSFS does become important even if you are working with C. Linux does not support interrupts in user mode - only in kernel mode. What this means is that you cannot work with GPIO interrupts using C. However there is a mechanism in Linux for allowing user mode programs to react to file events and this can be used to implement a sort of GPIO interrupt facility. More of this in the next chapter.
Now On Sale!
You can now buy a print or ebook edition of Raspberry Pi IoT in C from Amazon.
For Errata and Listings Visit: IO Press
This our ebook on using the Raspberry Pi to implement IoT devices using the C programming language. The full contents can be seen below. Notice this is a first draft and a work in progress.
Chapter List
-
Introducing Pi (paper book only)
-
Getting Started With NetBeans In this chapter we look at why C is a good language to work in when you are creating programs for the IoT and how to get started using NetBeans. Of course this is where Hello C World makes an appearance.
-
First Steps With The GPIO
The bcm2835C library is the easiest way to get in touch with the Pi's GPIO lines. In this chapter we take a look at the basic operations involved in using the GPIO lines with an emphasis on output. How fast can you change a GPIO line, how do you generate pulses of a given duration and how can you change multiple lines in sync with each other? -
GPIO The SYSFS Way
There is a Linux-based approach to working with GPIO lines and serial buses that is worth knowing about because it provides an alternative to using the bcm2835 library. Sometimes you need this because you are working in a language for which direct access to memory isn't available. It is also the only way to make interrupts available in a C program. -
Input and Interrupts
There is no doubt that input is more difficult than output. When you need to drive a line high or low you are in command of when it happens but input is in the hands of the outside world. If your program isn't ready to read the input or if it reads it at the wrong time then things just don't work. What is worse is that you have no idea what your program was doing relative to the event you are trying to capture - welcome to the world of input. -
Memory Mapped I/O
The bcm2835 library uses direct memory access to the GPIO and other peripherals. In this chapter we look at how this works. You don't need to know this but if you need to modify the library or access features that the library doesn't expose this is the way to go. -
Near Realtime Linux
You can write real time programs using standard Linux as long as you know how to control scheduling. In fact it turns out to be relatively easy and it enables the Raspberry Pi to do things you might not think it capable of. There are also some surprising differences between the one and quad core Pis that make you think again about real time Linux programming. -
PWM
One way around the problem of getting a fast response from a microcontroller is to move the problem away from the processor. In the case of the Pi's processor there are some builtin devices that can use GPIO lines to implement protocols without the CPU being involved. In this chapter we take a close look at pulse width modulation PWM including, sound, driving LEDs and servos. -
I2C Temperature Measurement
The I2C bus is one of the most useful ways of connecting moderately sophisticated sensors and peripherals to the any processor. The only problem is that it can seem like a nightmare confusion of hardware, low level interaction and high level software. There are few general introductions to the subject because at first sight every I2C device is different, but here we present one. -
A Custom Protocol - The DHT11/22
In this chapter we make use of all of the ideas introduced in earlier chapters to create a raw interface with the low cost DHT11/22 temperature and humidity sensor. It is an exercise in implementing a custom protocol directly in C. -
One Wire Bus Basics
The Raspberry Pi is fast enough to be used to directly interface to 1-Wire bus without the need for drivers. The advantages of programming our own 1-wire bus protocol is that it doesn't depend on the uncertainties of a Linux driver. -
iButtons
If you haven't discovered iButtons then you are going to find of lots of uses for them. At its simples an iButton is an electronic key providing a unique coce stored in its ROM which can be used to unlock or simply record the presence of a particular button. What is good news is that they are easy to interface to a Pi. -
The DS18B20
Using the software developed in previous chapters we show how to connect and use the very popular DS18B20 temperature sensor without the need for external drivers. -
The Multidrop 1-wire bus
Some times it it just easier from the point of view of hardware to connect a set of 1-wire devices to the same GPIO line but this makes the software more complex. Find out how to discover what devices are present on a multi-drop bus and how to select the one you want to work with. -
SPI Bus
The SPI bus can be something of a problem because it doesn't have a well defined standard that every device conforms to. Even so if you only want to work with one specific device it is usually easy to find a configuration that works - as long as you understand what the possibilities are. -
SPI MCP3008/4 AtoD (paper book only)
-
Serial (paper book only)
-
Getting On The Web - After All It Is The IoT (paper book only)
-
WiFi (paper book only)