
Some times it it just easier from the point of view of hardware to connect a set of 1-wire devices to the same GPIO line but this makes the software more complex. Find out how to discover what devices are present on a multi-drop bus and how to select the one you want to work with.
Now On Sale!
You can now buy a print or ebook edition of Raspberry Pi IoT in C from Amazon.
For Errata and Listings Visit: IO Press

This our ebook on using the Raspberry Pi to implement IoT devices using the C programming language. The full contents can be seen below. Notice this is a first draft and a work in progress.
Chapter List
-
Introducing Pi (paper book only)
-
Getting Started With NetBeans In this chapter we look at why C is a good language to work in when you are creating programs for the IoT and how to get started using NetBeans. Of course this is where Hello C World makes an appearance.
-
First Steps With The GPIO
The bcm2835C library is the easiest way to get in touch with the Pi's GPIO lines. In this chapter we take a look at the basic operations involved in using the GPIO lines with an emphasis on output. How fast can you change a GPIO line, how do you generate pulses of a given duration and how can you change multiple lines in sync with each other? -
GPIO The SYSFS Way
There is a Linux-based approach to working with GPIO lines and serial buses that is worth knowing about because it provides an alternative to using the bcm2835 library. Sometimes you need this because you are working in a language for which direct access to memory isn't available. It is also the only way to make interrupts available in a C program. -
Input and Interrupts
There is no doubt that input is more difficult than output. When you need to drive a line high or low you are in command of when it happens but input is in the hands of the outside world. If your program isn't ready to read the input or if it reads it at the wrong time then things just don't work. What is worse is that you have no idea what your program was doing relative to the event you are trying to capture - welcome to the world of input. -
Memory Mapped I/O
The bcm2835 library uses direct memory access to the GPIO and other peripherals. In this chapter we look at how this works. You don't need to know this but if you need to modify the library or access features that the library doesn't expose this is the way to go. -
Near Realtime Linux
You can write real time programs using standard Linux as long as you know how to control scheduling. In fact it turns out to be relatively easy and it enables the Raspberry Pi to do things you might not think it capable of. There are also some surprising differences between the one and quad core Pis that make you think again about real time Linux programming. -
PWM
One way around the problem of getting a fast response from a microcontroller is to move the problem away from the processor. In the case of the Pi's processor there are some builtin devices that can use GPIO lines to implement protocols without the CPU being involved. In this chapter we take a close look at pulse width modulation PWM including, sound, driving LEDs and servos. -
I2C Temperature Measurement
The I2C bus is one of the most useful ways of connecting moderately sophisticated sensors and peripherals to the any processor. The only problem is that it can seem like a nightmare confusion of hardware, low level interaction and high level software. There are few general introductions to the subject because at first sight every I2C device is different, but here we present one. -
A Custom Protocol - The DHT11/22
In this chapter we make use of all of the ideas introduced in earlier chapters to create a raw interface with the low cost DHT11/22 temperature and humidity sensor. It is an exercise in implementing a custom protocol directly in C. -
One Wire Bus Basics
The Raspberry Pi is fast enough to be used to directly interface to 1-Wire bus without the need for drivers. The advantages of programming our own 1-wire bus protocol is that it doesn't depend on the uncertainties of a Linux driver. -
iButtons
If you haven't discovered iButtons then you are going to find of lots of uses for them. At its simples an iButton is an electronic key providing a unique coce stored in its ROM which can be used to unlock or simply record the presence of a particular button. What is good news is that they are easy to interface to a Pi. -
The DS18B20
Using the software developed in previous chapters we show how to connect and use the very popular DS18B20 temperature sensor without the need for external drivers. -
The Multidrop 1-wire bus
Some times it it just easier from the point of view of hardware to connect a set of 1-wire devices to the same GPIO line but this makes the software more complex. Find out how to discover what devices are present on a multi-drop bus and how to select the one you want to work with. -
SPI Bus
The SPI bus can be something of a problem because it doesn't have a well defined standard that every device conforms to. Even so if you only want to work with one specific device it is usually easy to find a configuration that works - as long as you understand what the possibilities are. -
SPI MCP3008/4 AtoD (paper book only)
-
Serial (paper book only)
-
Getting On The Web - After All It Is The IoT (paper book only)
-
WiFi (paper book only)
The1-wire bus has a very sophisticated addressing mechanisms that lets you discover what devices are connected to a single 1-wire implementation. This is an algorithm worth knowing about for its ingenious design and in this chapter a 1-wire bus scanning function is developed. Unlike the one presented by Maxim the 1-wire bus' inventor it is recursive and as a result simpler.
Every 1-wire bus device has a unique 64-bit serial number that serves as its address on the bus. You can select just one device by writing its serial number. However how do you discover what devices are connected?
The Hardware
The first thing to clear up is that you can run multiple 1-wire devices on the same bus by simply adding them in parallel. You only need a single pull up resistor no matter how many devices there are on the bus.

In this chapter the DS18B20 will be used as an example because it is often used in this way but the same techniques will work with other devices and mixed devices.
The 1-Wire Search Algorithm
The serial number has a standard format the least significant byte is a family code i.e. what sort of device it is, the next six bytes are the serial number and the most significant byte is a check sum.
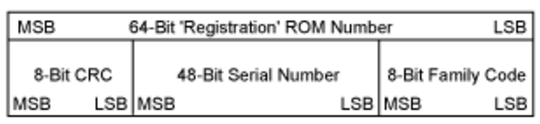
All eight bytes are used as the devices address and this means we can check for transmission errors by simply applying the CRC function developed in earlier chapters.
If you know what the serial numbers are of the devices are then you can simply write your program to work with them. However this means that you need to hardcode the serial numbers into your program which doesn't make it very portable.
A better solution is to scan the bus to search for connected devices and discover their serial numbers. This is what the 1-wire search algorithm is for. It has a reputation for being difficult to understand and even more difficult to implement. The good news it that it isn't as difficult as it first appears to do either and it is very instructive.
The basic idea is that the master sends an initialization pulse on the bus and all of the connected devices respond with their presence pulse.
Next the master places the search command 0xF0 on the bus which places all of the devices into search mode.
The master then reads two bits from the bus - these represent the first bit of all of the serial numbers from all of the devices. Given the nature of the 1-wire bus and the way the pull-up works what the master receives is the logical And of all of the bits sent from each of the slaves. The first bit the slaves send is their low order bit and the second bit is the logical complement i.e Not, of their first bit.
From these two bits the master can deduce the following:
| 1st Bit |
2nd Bit |
Conclusion |
|---|---|---|
| 0 | 0 | There is at least one device with a 1 in this position and another with a 0. |
| 0 | 1 | All devices have a 0 in this position |
| 1 | 0 | All devices have a 1 in this position |
| 1 | 1 | No devices are present |
Obviously 1,1 is an error condition - something has removed the devices from the bus.
In the case of receiving either a 0,1 or 1,0 the bit at that position has been determined to be a 0 or 1 respectively and all of the devices on the bus share this value in their serial numbers at this bit position.
If the master receives a 0,0 then there are devices with a 1 and devices with a 0 in their serial number at this position and the master can pick one of the values to explore further. Of course if the master wants to list all of the devices on the bus it has to return to this point and explore the second possibility.
The master selects which value it is going to follow by transmitting a single bit. All of the devices that match the bit in their serial number continue to transmit bits to the master all of the devices that do no have a serial number which matches the bit at that position go into a wait state until the next initialization pulse from the master.
The search algorithm determines a single bit of a serial number by reading two bits from the slaves and transmitting one bit to reduce the number of slaves participating in the scan.
By repeating the "read two bits write one" action the master eventually finds all 64 bits of one of the slave's serial number. It then has to back track to one of the bit locations where there was a choice of which bit to select and select the alternative.
In this way the master eventually lists all of the serial numbers on the bus.
Notice that the master starts off trying to determine bit zero for a single device connected to the bus. It determines each bit where all of the devices agree on a zero or a one. Each time the master encounters a bit conflict i.e. there are devices with a zero and a one in that bit position it selects one value and tells the devices with the other value to switch off. It then continues to determine the subsequent bit positions for the remaining devices. As the serial numbers are unique the master always ends up talking to just one device.
You can probably see that this is a depth first tree search with branches where the bit values are in conflict.
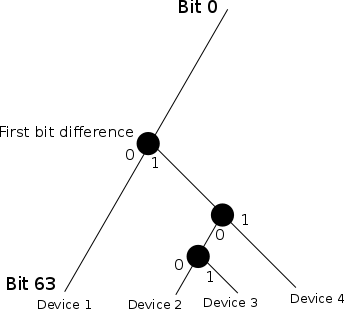
Suppose there four devices on the bus then they must all differ in at least one bit position. When the master starts the scan it reads all 1 or all 0 as it processes each but until it comes to the first location where there is another device with a different value at that bit. The master receives a 0,0 back from the slaves and arbitrarily sends a 0 to switch off all the slaves with a 1 in that location. The master then continues to read bits and if all of the other devices had a 1 in that bit position there are no more conflict.
When the master reaches bit 63 then it has the complete serial number of device 1.
It then backtracks to the bit position where the first conflict occurred. It now writes a 1 to switch off device 1 and continues to read bits until it encounters another conflict. Again it arbitrarily chooses a 0 and switches off all of the devices with a 1 in that bit position.
Notice in the example there are two devices with a 0 in that bit position and so as the master reads bits it encounters another conflict. Again it sends a 0 and switches of the other device and completes reading bits until it reaches bit 63 when it has the serial number of the second device.
The master now back tracks to the most recent conflict, sends a 1 and continues down the next branch to get the next devices serial number and so on until there are no conflict points to back track to.
Make sure you understand the algorithm before moving on to consider the implementation.
A Recursive Scan
The depth first tree search described above would normally be implemented most easily using recursion. While recursion is often considered difficult when it fits in with the nature of the problem it is often the easiest way to work.
A simple, but not quite complete, recursive algorithm for a depth first search described above is relatively easy to construct.
If you don't follow how it works then you can just use it but it is worth trying to understand as it is a really good example of how recursion can make things simpler.
The serial numbers of the devices found will be stored in an array of 64 bit integers:
int oneWireScan(uint8_t pin, uint64_t serial[]) {
We need two static variables to record a global state - bitcount records how deep in the tree we currently are and deviceCount records how many devices we have found so far:
static int bitcount = 0;
static int deviceCount = 0;
Notice that static variables are strange in that they are shared between all invocations of a function and they are only initialized once when the program starts - they are allocated on the heap not the stack.
The way to think about oneWireScan and how to think about it if you were writing it from scratch is that calling it will process the bit indicated by the current value of bitcount. As only as you increment bitcount before you call oneWireScan it will process all of the bits down to 63 by repeatedly calling itself to process the next bit.
Next we need to write starting and ending conditions. This is fairly usual with recursion. If the bitcount is greater than 63 then we have a full serial number and can move the deviceCount on by one and zero the bitcount.
    if (bitcount > 63) {
        bitcount = 0;
        deviceCount++;
        return deviceCount;
    }
Similarly if the bitcount is zero we need to start a traverse of the tree by sending a presence pulse, and then a search command. If there are no devices on the bus then we set bitcount to zero and return as there is nothing to do.
  if (bitcount == 0) {
        if (presence(pin) == 1) {
            bitcount = 0;
            return deviceCount;
        }
        deviceCount = 0;
        serial[deviceCount] = 0;
        writeByte(pin, 0xF0);
    };
Now we are ready read the first or next bit, it doesn't really make a lot of difference to what we have to do.
    int b1 = readBit(pin);
    int b2 = readBit(pin);
What we have to do does, however depend on b1 and b2. The two simplest conditions are if there are no conflicts on the bus and we simply need to set a zero or a one:
if (b1 == 0 && b2 == 1) {
        serial[deviceCount] >>= 1;
        writeBit(pin, 0);
        bitcount++;
        oneWireScan(pin, serial);
};
if (b1 == 1 && b2 == 0) {
        serial[deviceCount] >>= 1;
        serial[deviceCount] |= 0x8000000000000000LL;
        writeBit(pin, 1);
        bitcount++;
        oneWireScan(pin, serial);

};
We either shift a zero or a one into the serial number we are building up and then write a zero or a one to keep all of the slaves in the scan. Finally, and this is where the recursion comes in, we increment the bitcount and call onWireScan again to process the next bit. This is the part that worries most programmers but as long as you understand that we get a complete new version of oneWireScan and it processes the next bit just like the previous bit then it all works.
If we get b1 and b2 equal to one then we have an error condition and this terminates the processing of the next bit:
    if (b1 == 1 && b2 == 1) {
        bitcount = 0;
        return deviceCount;
    };
Notice that you have to set bitcount back to zero otherwise it will be wrong the next time you call the function.
The most difficult of the conditions to deal with is when there is a collision because you have to explore both branches of the tree. Using recursion however this is fairly easy:
  if (b1 == 0 && b2 == 0) {

        serial[deviceCount] >>= 1;
        writeBit(pin, 0);
        bitcount++;
        oneWireScan(pin, serial);

        serial[deviceCount] >>= 1;
        serial[deviceCount] |= 0x8000000000000000LL;
        writeBit(pin, 1);
        bitcount++;
        oneWireScan(pin, serial);    };

       return deviceCount;
}
All that happens here is that first we record a zero in the serial number and send a zero to turn off all the devices with a one in this position. Next we call oneWireScan again to complete this version of the serial number. When this returns we have the completed 64 bit serial number and deviceCount has been incremented. All we have to do next is follow the other branch - record a on in the serial number write a one to turn off all of the devices with zero in this position, we already have them in the array, and then call onWireScan to find the remaining bits.
That finishes the function and the final instruction is:
    return deviceCount;
}
If you try this out you will find it doesn't work.
The reason is very simple. In the conflict handling part of the function it is assumed that when the first call to oneWireScan returns the function is exactly where it was before the call i.e. the same bit position and ready to continue down the new branch of the tree. This is true as far as the function is concerned but the devices on the bus have physically moved on and are no longer a the same bit position. In fact the scan has completed we are at bit 63 and we need to start a new scan. Not only do we need to start a new scan we need to restore the hardware to the position it was in just before the call to oneWireScan.
This is the reason that most programmers don't implement the scan as a recursive function - the function is recursive but the hardware isn't. If we had a hardware stack we could simply push the state just before the call and then pop it when the call returns. We don't have a hardware stack but it is very easy to restore the state of the hardware.
In fact the only thing we need to record is the current bitposition in a local rather than static variable:
int bitposition = bitcount;
bitcount++;
oneWireScan(pin, serial);
Now when the onWireScan returns bitposition holds the number of the bit that it was working on before the call.
We can now restore the bitcount and start a completely new scan:
        bitcount = bitposition;
        if (presence(pin) == 1){
            bitposition=0;
            return 0;
        }
        writeByte(pin, 0xF0);
Now we are actually at bit zero of the scan but we want to be at the current bitposition. If you think about it the bits of the next serial number up to bitposition are going to be the same as the previously retrieved number - they are only different after this point. So we can retrieve the first part of the serial number from the previous serial number. The only difference is that the last bit that we want isn't going to be a zero it now needs to be a one to take us down the next branch of the tree. We can do this in one go:
uint64_t temp = serial[deviceCount - 1] | (0x1LL << (bitcount));

Now we need to walk the hardware though all of the bits in temp from bit zero to bitcount:
        int i;
        uint64_t bit;
        for (i = 0; i < bitcount+1; i++) {
            bit = temp & 0x01LL;
            temp >>= 1;
            b1 = readBit(pin);
            b2 = readBit(pin);
            writeBit(pin, bit);
            serial[deviceCount] >>= 1;
            serial[deviceCount] |= (bit << 63);
        }
We now have the hardware restored to the state just before the first call to oneWireScan and we have sent a one in place of the zero for the current bit. We can now call oneWireScan again to explore the alternative branch of the tree:
        bitcount++;
        oneWireScan(pin, serial);

    };
That's all we need - a recursive scan of the 1-wire bus.
oneWireScan
The complete function is:
int oneWireScan(uint8_t pin, uint64_t serial[]) {
    static int bitcount = 0;
    static int deviceCount = 0;

    if (bitcount > 63) {
        bitcount = 0;
        deviceCount++;
        return deviceCount;

    }

    if (bitcount == 0) {
        if (presence(pin) == 1) {
            bitcount = 0;
            return deviceCount;
        }
        deviceCount = 0;
        serial[deviceCount] = 0;
        writeByte(pin, 0xF0);
    };

    int b1 = readBit(pin);
    int b2 = readBit(pin);

    if (b1 == 0 && b2 == 1) {
        serial[deviceCount] >>= 1;
        writeBit(pin, 0);
        bitcount++;
        oneWireScan(pin, serial);
    };

    if (b1 == 1 && b2 == 0) {
        serial[deviceCount] >>= 1;
        serial[deviceCount] |= 0x8000000000000000LL;
        writeBit(pin, 1);
        bitcount++;
        oneWireScan(pin, serial);

    };

    if (b1 == 1 && b2 == 1) {
        bitcount = 0;
        return deviceCount;
    };

    if (b1 == 0 && b2 == 0) {
        serial[deviceCount] >>= 1;
        writeBit(pin, 0);
        int bitposition = bitcount;
        bitcount++;
        oneWireScan(pin, serial);

        bitcount = bitposition;
        if (presence(pin) == 1){
            bitposition=0;
            return 0;
        }

        writeByte(pin, 0xF0);
        uint64_t temp = serial[deviceCount - 1] | (0x1LL << (bitcount));
        int i;
        uint64_t bit;
        for (i = 0; i < bitcount+1; i++) {
            bit = temp & 0x01LL;
            temp >>= 1;
            b1 = readBit(pin);
            b2 = readBit(pin);
            writeBit(pin, bit);
            serial[deviceCount] >>= 1;
            serial[deviceCount] |= (bit << 63);
        }
        bitcount++;
        oneWireScan(pin, serial);
    };

    return deviceCount;
}
Scanning The Bus
Scanning the 1-wire bus is a strange thing to do. The reason is that in most cases the devices on the bus don't change. You set up a set of slaves and unless one or more of them fail the serial numbers don't change.
So why bother scanning the bus?
As long as you program in the serial numbers to your code it will all work. It is not uncommon to find people using 1-wire bus scanners to discover what is connected and then transcribing the serial numbers to the program - sometime even if there is only one device on the bus!
However discovering the devices on the bus dynamically does allow you to write programs that are robust against failures and auto configuring.
So instead of scanning the bus and hardcoding the serial numbers why not scan the bus each time there is a restart, or even sooner?
Now we come to the problems of scanning the bus.
The 1-wire bus isn't very robust. Its use of pullup resistors at such high speeds means that it doesn't take much capacitance to make the pulses look more like a capacitor charging up. Getting the wiring right for a 1-wire bus with multiple devices isn't easy. What is more scanning the bus is the only time, apart from the presence pulse, when multiple devices control the bus. A set up that works perfectly well with a single device often has problems when there is more than one device. In fact a standard 1-wire bus debugging technique is to remove all but one device and see if what wasn't working suddenly works.
You can get around some of the problems by lowering the value of the pull up resistor but this does increase the load on the driving GPIO lines and the slave devices. You can reduce the pull up to 2K or even less to account for the reduced working voltage of 3.3V. The 1-wire bus works best as 5V when the lines are long but it is usually not worth the trouble to add a 3.3V to 5V driver.
If you want to drive a very long line or just need the highest performance you can get then there is a technique which, while it might not be worth using in many situations is worth knowing about. It is called by a number of names but "controllable slew rate" is close enough. The idea is that when the master releases the bus then we have to wait for it to pull up via the resistor.

The transistor associated with SPU is related to the strong pull up needed for parasitic power power mode and you can ignore it.
The idea is that we can put a transistor in parallel with the pull up resistor and use it to pull the line up faster when appropriate. For example in when the master pulls the line low for a presence pulse it can trigger the pull up transistor when the pulse ends to get the line back up faster than just via the resistor. The fast pull up transistor is switched off just before the slaves start to pull the line low. You can use the fast pull up transistor in the same way when the master writes a zero or reads or writes a one. Of course you don't need to use it when the master reads a zero because the slave holds the line low for the whole time slot and there is no pull-up. It is claimed that lines as long as 500m can work in this mode. Notice that you now need an additional GPIO line to drive the fast pull up transistor. If you want to know more then see the Maxim design notes listed at the end of the chapter:
In practice you have to face up to the fact that you will get errors when working with the 1-wire bus and especially so with multiple devices. The problem is particularly bad if you are testing a circuit using a protoboard. Things often work better when you move to properly soldered connections and cables - but you will still get errors. However even with the best wiring possible you are still going to get errors due to the inevitable occasional interrupt that Linux will force on your program.
The only reasonable solution is to add error checking. You can error check the serial numbers using the standard CRC function.
Error Checking
Error checking a bus scan is fairly easy. The only problem is exactly how respond when you detect an error.
When the oneWireScan function returns we have an array with serial numbers ready to check. Each serial number is a 64 bit integer but the CRC checking function accepts an 8 byte array. At this point you might be starting to think about repacking the bits into an array. The solution is much simpler.
The layout in memory for an 8 byte array and a 64 bit integer is the same so all we have to do is cast the array to a suitable pointer type and pass the 64 bit integer as if it was an 8 byte array.
That is:
    uint64_t serial[15];
    uint8_t *code;
    int crc;
    int d;
    d = oneWireScan(RPI_GPIO_P1_11, serial);
    crc = 0;
    for (i = 0; i < d; i++) {
        code = (uint8_t*) & serial[i ];
        crc += crc8(code, 8);
    }
When you call oneWireScan you have to provide it with an array of 64 bit integers it can use to store serial numbers. It returns d the number of devices it has found and you need to check for CRC errors in each one. As there is no CRC error if they are all zero we can check for any CRC errors by summing the crc value for each serial number. The important line to explain is:
code = (uint8_t*) & serial[i ];
This takes the address of the ith element of serial and casts it to a pointer to uint8_t i.e. unsigned bytes. The function can use this as if it was an array of unsigned bytes and everything works without having to do any bit manipulation at all. Such is the power, and danger, of programming in C. Everything works as long as the basic assumption that a 64 bit unsigned integer and an 8-byte array are stored in memory in the same way - they usually are but there is no guarantee.
This short piece of code allows you to scan the bus and detect if there is an error. If there is then you can scan it again. Generally speaking you will mostly get a scans without error but you will get errors about one in ten scans for most configurations with small numbers of devices - up to 8 say. Notice that a scan transfers a lot of data and how long it takes depends on how many devices are connected to the bus.
How Many Devices?
Unfortunately there are other ways that a bus scan can go wrong. It can fail to detect one or more devices. It only takes a single bit error and the scan will abort getting the serial number for that device. If it is the first device in the scan and there are no backtrack points as yet the entire scan is canceled. However more usually just one device goes missing during a scan. This will not be detected as an error because the serial numbers returns will not be in error and will not trigger a CRC error.
There are a number of solution to this problem. You could add error detection to the scanning function but even if you did this correctly there are times when a device simply doesn't respond at all, presumably because it misses the initialization pulse. and hence goes missing without triggering an error.
In practice there are two easy things you can do to deal with missing devices.
You can scan the bus more than once and take the maximum number of correct serial numbers you find as the number of devices on the bus.
You can set the number of devices as a constant and only accept scans that return that number.
In practice it is normal to know how many devices there are on the bus and as such enforcing the scan to find that number is the best solution.
For example here is an error proof bus scan for exactly four devices:
  for (j = 0; j < 100; j++) {
            d = oneWireScan(RPI_GPIO_P1_11, serial);
            if (d != 4)continue;
            crc = 0;
            for (i = 0; i < d; i++) {
                code = (uint8_t*) & serial[i ];
                crc += crc8(code, 8);
            }
            if (crc == 0)break;
            bcm2835_delayMicroseconds(30000);
        }
You can adjust the retries and time delays to suit your application. The delay is included to give time for any noise or instability in the system to subside. If you don't use twisted pair cable then 1-wire is prone to RF interference. The scan is retried 100 times i.e. over a max of 3 seconds. If you don't get a good scan in that time something is seriously wrong - most likely one of the devices has failed.
Reading Specific Devices
Now that we have an array of serial numbers we can use them to read the devices they correspond to . Before you do this you should check the family codes, i.e. the first byte of the serial number to discover what kind of device you are about to work with. In practice you usually already know.
In this example it is assumed that all of the devices are DS18B20 temperature sensors.
To read a specific device all you have to do is send a Match ROM commands 0x55 in place of a Skip ROM 0xCC command and then send the 64 bit serial number to select a single device. After this the transaction is the same and you can, in the case of the DS18B20 initiate a conversion and then read the scratchpad.
The new function to read a specific device is very similar to the original that read a single device on the bus.
First we have to issue a convert command after selecting the device:
float getDeviceTemperature(uint8_t pin, uint64_t device) {
    if (presence(pin) == 1) return -1000;
    writeByte(pin, 0x55);
    int i, bit;
    uint64_t d = device;
    for (i = 0; i < 64; i++) {
        bit = d & 0x01;
        d = d >> 1;
        writeBit(pin, bit);
    }
    convert(pin);
After sending the Match ROM command 0x55 we send the bits of the device serial number, all 64 bits, low order bits first. This causes all of the devices that do not match the serial number to go into an idle state.
The convert function waits for the active device to complete its conversion.
Now we have to read the scratchpad. This works in the same way but we have to select the device a second time because the initialization pulse actives all of the devices. This may seem a nuisance but you can use it to your advantage if you want to read a set of devices in that you could first set each one to convert and then read each one after waiting long enough for them to settle:

    presence(pin);
    writeByte(pin, 0x55);
    d = device;
    for (i = 0; i < 64; i++) {
        bit = d & 0x01;
        d = d >> 1;
        writeBit(pin, bit);
    }
    writeByte(pin, 0xBE);

    uint8_t data[9];
    for (i = 0; i < 9; i++) {
        data[i] = readByte(pin);
    }
The final part of the function is identical to the original read temperature function.
The entire function but using a new matchROM function to select the device is:
float getDeviceTemperature(uint8_t pin, uint64_t device) {
    if (presence(pin) == 1) return -1000;

    matchROM(pin, device);
    convert(pin);
    presence(pin);
    matchROM(pin, device);
    writeByte(pin, 0xBE);

    uint8_t data[9];
    int i;
    for (i = 0; i < 9; i++) {
        data[i] = readByte(pin);
    }
    uint8_t crc = crc8(data, 9);
    if (crc != 0) return -2000;
    int t1 = data[0];
    int t2 = data[1];
    int16_t temp1 = (t2 << 8 | t1);
    float temp = (float) temp1 / 16;
    return temp;
}

void matchROM(uint8_t pin, uint64_t device) {
    writeByte(pin, 0x55);
    int i, bit;
    for (i = 0; i < 64; i++) {
        bit = device & 0x01;
        device >>= 1;
        writeBit(pin, bit);
    }
An example main program that scans the bus and reads the devices found is:
int main(int argc, char **argv) {
    const struct sched_param priority = {5};
    sched_setscheduler(0, SCHED_FIFO, &priority);
    mlockall(MCL_CURRENT | MCL_FUTURE);
    if (!bcm2835_init())
        return 1;
    bcm2835_gpio_fsel(RPI_GPIO_P1_07, BCM2835_GPIO_FSEL_INPT);
    uint64_t serial[15];
    int i, j;
    uint8_t *code;
    int crc,d;
    for (;;) {
        for (j = 0; j < 1000; j++) {
            d = oneWireScan(RPI_GPIO_P1_07, serial);
            if (d != 4)continue;
            crc = 0;
            for (i = 0; i < d; i++) {
                code = (uint8_t*) & serial[i ];
                crc += crc8(code, 8);
            }
            printf("%hho %d %d\n\r", crc, d, j);
            fflush(stdout);
            if (crc == 0)break;
            bcm2835_delayMicroseconds(30000);
        }
        for (i = 0; i < d; i++) {
            printf("%llX \n", serial[i]);
            float temp = getDeviceTemperature(RPI_GPIO_P1_07, serial[i]);
            printf("temperature = %f C \n", temp);
        }
    }
Alarm Scan
You can use the same technique to pick out devices with an alarm set. The DS18B20 for example can have a high and low limit temperature set by writing data to the scratch pad. If the temperature goes outside of these limits then an alarm is set. You can obtain the serial numbers of all devices with an alarm set by scanning the bus but using Alarm Search 0xEC rather than Match ROM 0x55 - just change the code send in the function. In this case you will get a list of serial numbers corresponding to devices with alarms set and you can continue on to process just these.
This seems like an attractive option but given the propensity for errors it isn't particularly robust - you could easily miss a device with an alarm set. If possible it is better to perform a manual scan of each device on the bus and read its alarm status.
Final Thoughts
The 1-wire bus is simple and immensely useful - as long as you don't try to push it too far. Problems start to arise when you use long, over 2 or 4m connections or try to put lots of devices on the same bus. With the price of a Pi Zero and the number of GPIO lines available this seems like an unnecessary complication.
Now On Sale!
You can now buy a print or ebook edition of Raspberry Pi IoT in C from Amazon.
For Errata and Listings Visit: IO Press
This our ebook on using the Raspberry Pi to implement IoT devices using the C programming language. The full contents can be seen below. Notice this is a first draft and a work in progress.
Chapter List
-
Introducing Pi (paper book only)
-
Getting Started With NetBeans In this chapter we look at why C is a good language to work in when you are creating programs for the IoT and how to get started using NetBeans. Of course this is where Hello C World makes an appearance.
-
First Steps With The GPIO
The bcm2835C library is the easiest way to get in touch with the Pi's GPIO lines. In this chapter we take a look at the basic operations involved in using the GPIO lines with an emphasis on output. How fast can you change a GPIO line, how do you generate pulses of a given duration and how can you change multiple lines in sync with each other? -
GPIO The SYSFS Way
There is a Linux-based approach to working with GPIO lines and serial buses that is worth knowing about because it provides an alternative to using the bcm2835 library. Sometimes you need this because you are working in a language for which direct access to memory isn't available. It is also the only way to make interrupts available in a C program. -
Input and Interrupts
There is no doubt that input is more difficult than output. When you need to drive a line high or low you are in command of when it happens but input is in the hands of the outside world. If your program isn't ready to read the input or if it reads it at the wrong time then things just don't work. What is worse is that you have no idea what your program was doing relative to the event you are trying to capture - welcome to the world of input. -
Memory Mapped I/O
The bcm2835 library uses direct memory access to the GPIO and other peripherals. In this chapter we look at how this works. You don't need to know this but if you need to modify the library or access features that the library doesn't expose this is the way to go. -
Near Realtime Linux
You can write real time programs using standard Linux as long as you know how to control scheduling. In fact it turns out to be relatively easy and it enables the Raspberry Pi to do things you might not think it capable of. There are also some surprising differences between the one and quad core Pis that make you think again about real time Linux programming. -
PWM
One way around the problem of getting a fast response from a microcontroller is to move the problem away from the processor. In the case of the Pi's processor there are some builtin devices that can use GPIO lines to implement protocols without the CPU being involved. In this chapter we take a close look at pulse width modulation PWM including, sound, driving LEDs and servos. -
I2C Temperature Measurement
The I2C bus is one of the most useful ways of connecting moderately sophisticated sensors and peripherals to the any processor. The only problem is that it can seem like a nightmare confusion of hardware, low level interaction and high level software. There are few general introductions to the subject because at first sight every I2C device is different, but here we present one. -
A Custom Protocol - The DHT11/22
In this chapter we make use of all of the ideas introduced in earlier chapters to create a raw interface with the low cost DHT11/22 temperature and humidity sensor. It is an exercise in implementing a custom protocol directly in C. -
One Wire Bus Basics
The Raspberry Pi is fast enough to be used to directly interface to 1-Wire bus without the need for drivers. The advantages of programming our own 1-wire bus protocol is that it doesn't depend on the uncertainties of a Linux driver. -
iButtons
If you haven't discovered iButtons then you are going to find of lots of uses for them. At its simples an iButton is an electronic key providing a unique coce stored in its ROM which can be used to unlock or simply record the presence of a particular button. What is good news is that they are easy to interface to a Pi. -
The DS18B20
Using the software developed in previous chapters we show how to connect and use the very popular DS18B20 temperature sensor without the need for external drivers. -
The Multidrop 1-wire bus
Some times it it just easier from the point of view of hardware to connect a set of 1-wire devices to the same GPIO line but this makes the software more complex. Find out how to discover what devices are present on a multi-drop bus and how to select the one you want to work with. -
SPI Bus
The SPI bus can be something of a problem because it doesn't have a well defined standard that every device conforms to. Even so if you only want to work with one specific device it is usually easy to find a configuration that works - as long as you understand what the possibilities are. -
SPI MCP3008/4 AtoD (paper book only)
-
Serial (paper book only)
-
Getting On The Web - After All It Is The IoT (paper book only)
-
WiFi (paper book only)
Related Articles
Advanced 1-Wire Network Driver
Guidelines for Reliable Long Line 1-Wire Networks
Real Raspberry Pi - Getting Started And Custom NOOBS