
The SPI bus can be difficult to make work at first but once you know what to look for about how the slave claims to work it gets easier. To demonstrate how its done let's add eight channels of 12 bit AtoD using the MCP3008.

Now On Sale!
You can now buy a print or ebook edition of Raspberry Pi IoT in C from Amazon.
For Errata and Listings Visit: IO Press
This our ebook on using the Raspberry Pi to implement IoT devices using the C programming language. The full contents can be seen below. Notice this is a first draft and a work in progress.
Chapter List
-
Introducing Pi (paper book only)
-
Getting Started With NetBeans In this chapter we look at why C is a good language to work in when you are creating programs for the IoT and how to get started using NetBeans. Of course this is where Hello C World makes an appearance.
-
First Steps With The GPIO
The bcm2835C library is the easiest way to get in touch with the Pi's GPIO lines. In this chapter we take a look at the basic operations involved in using the GPIO lines with an emphasis on output. How fast can you change a GPIO line, how do you generate pulses of a given duration and how can you change multiple lines in sync with each other? -
GPIO The SYSFS Way
There is a Linux-based approach to working with GPIO lines and serial buses that is worth knowing about because it provides an alternative to using the bcm2835 library. Sometimes you need this because you are working in a language for which direct access to memory isn't available. It is also the only way to make interrupts available in a C program. -
Input and Interrupts
There is no doubt that input is more difficult than output. When you need to drive a line high or low you are in command of when it happens but input is in the hands of the outside world. If your program isn't ready to read the input or if it reads it at the wrong time then things just don't work. What is worse is that you have no idea what your program was doing relative to the event you are trying to capture - welcome to the world of input. -
Memory Mapped I/O
The bcm2835 library uses direct memory access to the GPIO and other peripherals. In this chapter we look at how this works. You don't need to know this but if you need to modify the library or access features that the library doesn't expose this is the way to go. -
Near Realtime Linux
You can write real time programs using standard Linux as long as you know how to control scheduling. In fact it turns out to be relatively easy and it enables the Raspberry Pi to do things you might not think it capable of. There are also some surprising differences between the one and quad core Pis that make you think again about real time Linux programming. -
PWM
One way around the problem of getting a fast response from a microcontroller is to move the problem away from the processor. In the case of the Pi's processor there are some builtin devices that can use GPIO lines to implement protocols without the CPU being involved. In this chapter we take a close look at pulse width modulation PWM including, sound, driving LEDs and servos. -
I2C Temperature Measurement
The I2C bus is one of the most useful ways of connecting moderately sophisticated sensors and peripherals to the any processor. The only problem is that it can seem like a nightmare confusion of hardware, low level interaction and high level software. There are few general introductions to the subject because at first sight every I2C device is different, but here we present one. -
A Custom Protocol - The DHT11/22
In this chapter we make use of all of the ideas introduced in earlier chapters to create a raw interface with the low cost DHT11/22 temperature and humidity sensor. It is an exercise in implementing a custom protocol directly in C. -
One Wire Bus Basics
The Raspberry Pi is fast enough to be used to directly interface to 1-Wire bus without the need for drivers. The advantages of programming our own 1-wire bus protocol is that it doesn't depend on the uncertainties of a Linux driver. -
iButtons
If you haven't discovered iButtons then you are going to find of lots of uses for them. At its simples an iButton is an electronic key providing a unique coce stored in its ROM which can be used to unlock or simply record the presence of a particular button. What is good news is that they are easy to interface to a Pi. -
The DS18B20
Using the software developed in previous chapters we show how to connect and use the very popular DS18B20 temperature sensor without the need for external drivers. -
The Multidrop 1-wire bus
Some times it it just easier from the point of view of hardware to connect a set of 1-wire devices to the same GPIO line but this makes the software more complex. Find out how to discover what devices are present on a multi-drop bus and how to select the one you want to work with. -
SPI Bus
The SPI bus can be something of a problem because it doesn't have a well defined standard that every device conforms to. Even so if you only want to work with one specific device it is usually easy to find a configuration that works - as long as you understand what the possibilities are. -
SPI MCP3008/4 AtoD (paper book only)
-
Serial (paper book only)
-
Getting On The Web - After All It Is The IoT (paper book only)
-
WiFi (paper book only)
The Raspberry Pi doesn't have any analog inputs or outputs. You can buy expansion boards, HATs, that add multiple interfaces including analog I/O but some times you just don't need that many new features. The MCP3000 familiy of AtoD convertors provides a simple, cheap and low cost alternative to fitting an entire expansion board. Although the MCP3008 with 8 AtoD inputs and the MCP3004 with 4 AtoD inputs at 10 bits precision are the best known there are other devices in the family including 12 and 13 bit precision and differential inputs at around the same sort of cost $1 to $2.
In this chapter the MCP3008 is used because it is readily available and provides a good performance at low cost but the other devices in the family work in the same way and could be easily substituted.
The MCP3008
The MCP3008 is available in a number of different packages but the standard 16 pin PDIP is the eaiset to work with using a prototyping board. You can buy it from the usual sources including Amazon if you need one in a hurry.
Its pin outs are fairly self explanitory:
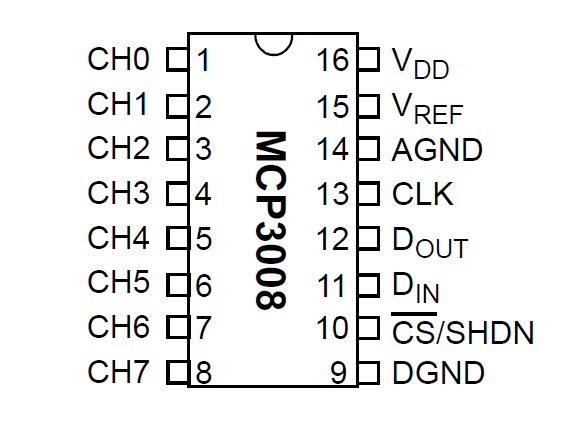
You can see that the analog inputs are on the left and the power and SPI bus connections are on the right. The conversion accuracy is claimed to be 10 bits but how many of these bits correspond to reality and how many are noise depends on how you design the layout of the circuit.
You need to take great care if you need high accuracy. For eample you will notice that there are two voltage inputs VDD and VREF. VDD is the supply voltage that runs the chip and VREF is the refrence voltage that is used to compare the input voltage. Obviously if you want highest accuracy VREF, which has to be lower than or equal to VDD, should be set by an accurate low noise voltage source - however in most applications VREF and VDD are simply connected together and the usual, low quality supply voltage is used as the reference. If this isn't good enough then you can use anything from a zener diode to a precision voltage reference chip such as the TL431. At the very least however you should add a 1uF capacitor between the VDD pin and the VREF pin to ground.
The MC3000 family is a type of AtoD called a sucessive approximation converter. You don't need to know how it works to use it but it isn't difficult. The idea is that first a voltage is generated equal to VREF/2 and the input voltage is compared to this. If it is less then the most significant bit is a zero and if it is more or equal then it is a one. At the next step the voltage generated is VREF/2+VREF/4 and the comparison is repeated to generate the next bit.
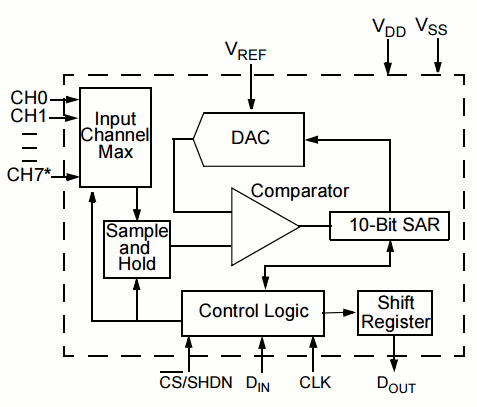
You can see that sucessive approximaton fits in well with a serial bus as each bit can be obtained in the time needed to transmit the previous bit. However the conversion is relatively slow and a sample and hold circuit has to be used to keep the input to the convertor stage fixed. The sample and hold takes the form of a 20pF capacitor and a switch. The only reason you need to know about this is that the conversion has to be complete in a time that is short compared to the discharge time of the capacitor - so for accuracy there is a minimum SPI clock rate as well as a maximum.
Also to charge the capacitor quickly enough for it to follow a changing voltage it needs to be connected to a low impedance source. In most cases this isn't a problem but if it is you need to include an op amp. If you are using an op amp buffer then you might as well implement a filter to remove frequencies from the signal that are too fast for the AtoD to respond to - an anti-aliasing filter. How all this works takes us into the relm of analog electronics and signal processing and well out of the core subject matter of this book.
You can also use the AtoD channels in pairs - differential mode - to measure the voltage difference them. For example, in differential mode you measure the difference between CH0 and CH1 i.e. what you measure is CH1-CH0. In most cases you want to use all eight channels in single-ended mode.
In principle you can take 200K samples per second but only at the upper limit of the supply voltage VDD=5V falling to 75K samples per second at its lower limit of VDD=2.7V.
The SPI clock limits are a maximum of 3.6MHz at 5V and 1.35MHz at 2.7V. The clock can go slower but because of the problem with the sample and hold mentioned earlier it shouldn't go below 10kHz.
How fast we can take samples is discussed later in this chapter.
Connecting MCP3008 To The Pi
The connection to the PI's SPI bus is very simple and can be seen in the diagram below.
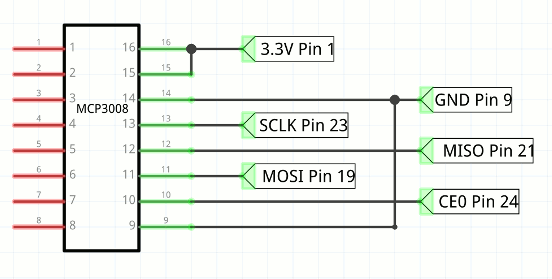
The only additional component that is recommended is a 1uF capacitor connected between pins 15 and 16 to ground mounted as close to the chip as possible. As discussed in the previous section you might want a separate voltage reference for pin 15 rather than just using the 3.3V supply.
Basic Configuration
Now we come to the configuration of the SPI bus.
We have some rough figures for the SPI clock speed - 10kHz to a little more than 1.35MHz. So an inital clock divider of 4096 giving a frequency of 61kHz seems a reasonable starting point.
From the data sheet the CS has to be active low and the most significant bit first is the default for both the master and the slave. The only puzzle is what mode to use? This is listed in the data sheet if you look really carefully and it can be mode 0,0 with clock active high or mode 1,1 with clock active low.
For simplicity we can use mode 0,0 which is mode0 in the bcm2835 library.
We now have enough information to intialize the slave:
bcm2835_spi_setDataMode(BCM2835_SPI_MODE0);
bcm2835_spi_setClockDivider(BCM2835_SPI_CLOCK_DIVIDER_4096);
bcm2835_spi_chipSelect(BCM2835_SPI_CS0);
bcm2835_spi_setChipSelectPolarity(BCM2835_SPI_CS0, LOW);
bcm2835_spi_setBitOrder(BCM2835_SPI_BIT_ORDER_MSBFIRST);
The Protocol
Now we have the SPI initalized and ready to transfer data but what data do we transfer? The SPI bus doesn't have any standard commands or addressing structure. Each device responds to data sent in different ways and sends data back in different ways. You simply have to read the data sheet fo find out what the commands and responses are.
Reading the data sheet might be initally confusing because it says that what you have to do is send five bits to the slave - a start bit, a bit that selects its operating mode single or differential and a three bit channel number. The operating mode is 1 for single ended and 0 for differential. So to read channel 3 i.e. 011, in single ended mode you would send the slave
11011xxx
where xxx means don't care. The response from the slave is that it holds its output in a high impedance state until the sixth clock pulse it then sends a zero bit on the seventh followed by bit 9 of the data on clock eight. That is the slave sends back:
xxxxxx0b9
where x means indeterminate. The remaining 9-bits are sent back in response to the next nine clock pulses. This means you have to transfer three bytes to get all ten bits of data.
This all makes reading the data in eight bit chunks confusing.
The data sheet suggests a different way of doing the job that delivers the data more neatly packed into three bytes. What it suggests is to send a single byte
00000001
the slave transfers random data at the same time which is ignored. The final 1 is treated as the start bit. If you now transfer a second byte with most significant bit indicating single or differential mode, then a three bit channel address and the remaing bits set to zero the slave will respond with the null and the top two bits of the conversion. Now all you have to do to get the final eight bits of data is to read a third byte:

You can do it the first way that the data sheet describes but this way you get two neat bytes containing the data with all the low order bits in their correct positions.
Using this information we can now write some instructions that read a given channel. For example to read channel zero we first send a byte set to 0x01 as the start bit and ignore the byte the slave transfers. Next we send 0x80 to select single ended and chanel zero and keep the byte the slave sends back as the high order two bits. Finally we send a zero byte so that we get the low order bits from the slave i.e.
char buf[] = {0x01,0x80,0x00};
char readBuf[3];
bcm2835_spi_transfernb(buf,readBuf,3);
Notice you cannot send the three bytes one at a time using transfer because that results in the CS line being deactivated between the transfer of each byte.
To get the data out of readBuf we need to do some bit manipulation:
int data= ((int)readBuf[1] & 0x03) << 8 | (int) readBuf[2];
The first part of the expression extracts the low three bits from the first byte the slave sent and as these are the most significant bits they are shifted up eight places. The rest of the bits are then ored with them to give the full 10 bit result.
To convert to volts we use:
float volts=(float)data*3.3f/1023.0f;
assuming that VREF is 3.3V.
In a real application you would also need to convert the voltage to some other quantitiy like temperature or light level.
Some Packaged Functions
This all works but it would be good to have a function that read the AtoD on a specifed channel:
int readADC(uint8_t chan){
char buf[] = {0x01,(0x08|chan)<<4,0x00};
char readBuf[3];
bcm2835_spi_transfernb(buf,readBuf,3);
return ((int)readBuf[1] & 0x03) << 8 | (int) readBuf[2];
}
Notice that this only works if the SPI bus has been initilized and set up correctly. An initalization function is something like:
How Fast
Once you have the basic facilties working the next question is alway how fast does something work. In this case we need to know what sort or data rates we can achieve using this AtoD converter.
The simplest way fo finding this out is to use the fastest read loop, for channel 5 say:
for(;;){
int data=readADC(0x5);
}
With the clock divider we used earlier:
BCM2835_SPI_CLOCK_DIVIDER_4096
we get a measured clock rate of 61kHz the sampling rate is measured to be 2.26kHz. This is perfectly reasonable as it takes at least 24 clock pulses to read the data. Most of the time in the loop is due to the 24 clock pulses so there is little to be gained from optimization.
Increasing the clock rate to around 900kHz by setting the divider to 256 pushes the sampling rate to 36kHz which is just fast enough to digitize audio as long as you don't waste too much time in the loop in processing.
Changing the clock rate to 2Mhz, divider 128, pushes the sampling up to 70kHz which is plenty fast enough for most audio.
The fastest sample rate achieved with the samples of the device to hand was a clock rate of 4Mhz, divider 32, and a sampling rate of 216kHz - however the readings became increasingly unrealiable in the low order bits. Perhaps this could be improved with the use of a buffer and careful layout but for a prototype board a sampling rate of 70kHz is the limit. Also notice the clock rate goes up you have to ensure that the voltage source is increasingly low impedance to allow the sample and hold to charge in a short time.
Summary
Making SPI work with any particular device has four steps
- discover how to connect the device to the SPI put this is a matter of identifying pin outs and mostly what chip selects are supported.
- find out how to configure the Pi's SPI bus to work with the device. This is mostly a matter of clock speed and mode.
- identify the commands that you need to send to the device to get it to do something and what data it sends back as a response.
- find or workout what the relationship between the raw reading, the voltage and the quanity the voltage represents is.
Now On Sale!
You can now buy a print or ebook edition of Raspberry Pi IoT in C from Amazon.
For Errata and Listings Visit: IO Press
This our ebook on using the Raspberry Pi to implement IoT devices using the C programming language. The full contents can be seen below. Notice this is a first draft and a work in progress.
Chapter List
-
Introducing Pi (paper book only)
-
Getting Started With NetBeans In this chapter we look at why C is a good language to work in when you are creating programs for the IoT and how to get started using NetBeans. Of course this is where Hello C World makes an appearance.
-
First Steps With The GPIO
The bcm2835C library is the easiest way to get in touch with the Pi's GPIO lines. In this chapter we take a look at the basic operations involved in using the GPIO lines with an emphasis on output. How fast can you change a GPIO line, how do you generate pulses of a given duration and how can you change multiple lines in sync with each other? -
GPIO The SYSFS Way
There is a Linux-based approach to working with GPIO lines and serial buses that is worth knowing about because it provides an alternative to using the bcm2835 library. Sometimes you need this because you are working in a language for which direct access to memory isn't available. It is also the only way to make interrupts available in a C program. -
Input and Interrupts
There is no doubt that input is more difficult than output. When you need to drive a line high or low you are in command of when it happens but input is in the hands of the outside world. If your program isn't ready to read the input or if it reads it at the wrong time then things just don't work. What is worse is that you have no idea what your program was doing relative to the event you are trying to capture - welcome to the world of input. -
Memory Mapped I/O
The bcm2835 library uses direct memory access to the GPIO and other peripherals. In this chapter we look at how this works. You don't need to know this but if you need to modify the library or access features that the library doesn't expose this is the way to go. -
Near Realtime Linux
You can write real time programs using standard Linux as long as you know how to control scheduling. In fact it turns out to be relatively easy and it enables the Raspberry Pi to do things you might not think it capable of. There are also some surprising differences between the one and quad core Pis that make you think again about real time Linux programming. -
PWM
One way around the problem of getting a fast response from a microcontroller is to move the problem away from the processor. In the case of the Pi's processor there are some builtin devices that can use GPIO lines to implement protocols without the CPU being involved. In this chapter we take a close look at pulse width modulation PWM including, sound, driving LEDs and servos. -
I2C Temperature Measurement
The I2C bus is one of the most useful ways of connecting moderately sophisticated sensors and peripherals to the any processor. The only problem is that it can seem like a nightmare confusion of hardware, low level interaction and high level software. There are few general introductions to the subject because at first sight every I2C device is different, but here we present one. -
A Custom Protocol - The DHT11/22
In this chapter we make use of all of the ideas introduced in earlier chapters to create a raw interface with the low cost DHT11/22 temperature and humidity sensor. It is an exercise in implementing a custom protocol directly in C. -
One Wire Bus Basics
The Raspberry Pi is fast enough to be used to directly interface to 1-Wire bus without the need for drivers. The advantages of programming our own 1-wire bus protocol is that it doesn't depend on the uncertainties of a Linux driver. -
iButtons
If you haven't discovered iButtons then you are going to find of lots of uses for them. At its simples an iButton is an electronic key providing a unique coce stored in its ROM which can be used to unlock or simply record the presence of a particular button. What is good news is that they are easy to interface to a Pi. -
The DS18B20
Using the software developed in previous chapters we show how to connect and use the very popular DS18B20 temperature sensor without the need for external drivers. -
The Multidrop 1-wire bus
Some times it it just easier from the point of view of hardware to connect a set of 1-wire devices to the same GPIO line but this makes the software more complex. Find out how to discover what devices are present on a multi-drop bus and how to select the one you want to work with. -
SPI Bus
The SPI bus can be something of a problem because it doesn't have a well defined standard that every device conforms to. Even so if you only want to work with one specific device it is usually easy to find a configuration that works - as long as you understand what the possibilities are. -
SPI MCP3008/4 AtoD (paper book only)
-
Serial (paper book only)
-
Getting On The Web - After All It Is The IoT (paper book only)
-
WiFi (paper book only)
Related Articles
Real Raspberry Pi - Getting Started And Custom NOOBS
To be informed about new articles on I Programmer, sign up for our weekly newsletter, subscribe to the RSS feed and follow us on, Twitter, Facebook, Google+ or Linkedin.
<ASIN:B00EU1PY06>