This is the first chapter of our ongoing book on using the Raspberry Pi in C. It starts the ball rolling by explaining how to get NetBeans, a C/C++ IDE, up and running. We get as far as a first "Hello World" program..
There are lots of ways to program the Pi from Scratch, through Python to assembler. Each language has its advantages and disadvantages but there are times when subtle arguments aren't necessary. If you want to program the Pi in a way that extracts the maximum efficiency and without any limits then C is the obvious choice. It is easier to program in C than in assembler and the results are almost the same in terms of speed.
You can describe C as a machine independent assembly language and hence when you learn it you get deeper into the system than with other languages - you tend to really know what is going on. This makes it a good way to improve your understanding of computers and computing in general.
Now On Sale!
You can now buy a print or ebook edition of Raspberry Pi IoT in C from Amazon.
For Errata and Listings Visit: IO Press

This our ebook on using the Raspberry Pi to implement IoT devices using the C programming language. The full contents can be seen below. Notice this is a first draft and a work in progress.
Chapter List
-
Introducing Pi (paper book only)
-
Getting Started With NetBeans In this chapter we look at why C is a good language to work in when you are creating programs for the IoT and how to get started using NetBeans. Of course this is where Hello C World makes an appearance.
-
First Steps With The GPIO
The bcm2835C library is the easiest way to get in touch with the Pi's GPIO lines. In this chapter we take a look at the basic operations involved in using the GPIO lines with an emphasis on output. How fast can you change a GPIO line, how do you generate pulses of a given duration and how can you change multiple lines in sync with each other? -
GPIO The SYSFS Way
There is a Linux-based approach to working with GPIO lines and serial buses that is worth knowing about because it provides an alternative to using the bcm2835 library. Sometimes you need this because you are working in a language for which direct access to memory isn't available. It is also the only way to make interrupts available in a C program. -
Input and Interrupts
There is no doubt that input is more difficult than output. When you need to drive a line high or low you are in command of when it happens but input is in the hands of the outside world. If your program isn't ready to read the input or if it reads it at the wrong time then things just don't work. What is worse is that you have no idea what your program was doing relative to the event you are trying to capture - welcome to the world of input. -
Memory Mapped I/O
The bcm2835 library uses direct memory access to the GPIO and other peripherals. In this chapter we look at how this works. You don't need to know this but if you need to modify the library or access features that the library doesn't expose this is the way to go. -
Near Realtime Linux
You can write real time programs using standard Linux as long as you know how to control scheduling. In fact it turns out to be relatively easy and it enables the Raspberry Pi to do things you might not think it capable of. There are also some surprising differences between the one and quad core Pis that make you think again about real time Linux programming. -
PWM
One way around the problem of getting a fast response from a microcontroller is to move the problem away from the processor. In the case of the Pi's processor there are some builtin devices that can use GPIO lines to implement protocols without the CPU being involved. In this chapter we take a close look at pulse width modulation PWM including, sound, driving LEDs and servos. -
I2C Temperature Measurement
The I2C bus is one of the most useful ways of connecting moderately sophisticated sensors and peripherals to the any processor. The only problem is that it can seem like a nightmare confusion of hardware, low level interaction and high level software. There are few general introductions to the subject because at first sight every I2C device is different, but here we present one. -
A Custom Protocol - The DHT11/22
In this chapter we make use of all of the ideas introduced in earlier chapters to create a raw interface with the low cost DHT11/22 temperature and humidity sensor. It is an exercise in implementing a custom protocol directly in C. -
One Wire Bus Basics
The Raspberry Pi is fast enough to be used to directly interface to 1-Wire bus without the need for drivers. The advantages of programming our own 1-wire bus protocol is that it doesn't depend on the uncertainties of a Linux driver. -
iButtons
If you haven't discovered iButtons then you are going to find of lots of uses for them. At its simples an iButton is an electronic key providing a unique coce stored in its ROM which can be used to unlock or simply record the presence of a particular button. What is good news is that they are easy to interface to a Pi. -
The DS18B20
Using the software developed in previous chapters we show how to connect and use the very popular DS18B20 temperature sensor without the need for external drivers. -
The Multidrop 1-wire bus
Some times it it just easier from the point of view of hardware to connect a set of 1-wire devices to the same GPIO line but this makes the software more complex. Find out how to discover what devices are present on a multi-drop bus and how to select the one you want to work with. -
SPI Bus
The SPI bus can be something of a problem because it doesn't have a well defined standard that every device conforms to. Even so if you only want to work with one specific device it is usually easy to find a configuration that works - as long as you understand what the possibilities are. -
SPI MCP3008/4 AtoD (paper book only)
-
Serial (paper book only)
-
Getting On The Web - After All It Is The IoT (paper book only)
-
WiFi (paper book only)
Sometimes you don't need speed, even in an IoT application. For example, if you just want to flash a few LEDs or read a temperature sensor in a human time scale then you can write in almost any language. However, if you want to directly interface with other systems and control externally connected hardware at its full speed then C is your best choice. Similarly, if timing is critical, then C is the only way to go.
Put simply if you can't make your application work fast enough in C then you probably can't in any language.
You might be worried that you are some how trapping yourself in a low level language and will be unable to take advantage of sophisticated programming practices. Your get out clause is that C is a subset of C++ and you can break out of C anytime you feel like it and start writing code that has objects and all the trimmings of a modern language. Of course the code you write might not be quite as efficient as the C code you have had to give up but it is still fast.
So C is worth learning.
How do we get started?
Getting Started In C
You can program in C in many different ways. All of the software you need to run a C program is already installed on a standard Pi running Raspbian. You can use an editor on the Pi to create your program and then compile and run it using the command line. However there are easy to use IDEs that make programming in C fast and painless and they provide debugging facilities that make finding bugs much quicker.
You could use Genny, Eclipse or NetBeans - they are all open source but in practice NetBeans is the most powerful and this is the approach we are going to use. If you want to use one of the others or just a text editor and the command line then you can and everything described will work - but NetBeans is worth a try because the help it gives you with generating code and debugging will save you a lot of time in the long run. It is also open source and free to use.
There are two distinct ways you can work with NetBeans and the Pi:
- You could install NetBeans on a Raspberry Pi and work with it via the GUI desktop i.e. directly on the Pi. In this case you are using the Pi as if it was a full desktop computer and it is your development and test machine.
- You could connect the Pi to a desktop machine and make use of remote development features of NetBeans. In this case you are using the Pi as a Build Host and the desktop machine as the development environment.
In both cases the Pi does the compiling and the running of the program. In practice the remote development approach tends to work better because the desktop machine has the power to run NetBeans fast.
It also means that you can change the Pi that you are testing the code on very easily with all of the code stored on the desktop machine. This is very useful because you can try your program out on a range of Raspberry Pis and swap machines simply by changing the build host used for the project.
The desktop machine can be a Windows, OSX or even another Linux machine.
Before we can get down to work we need to find out how to set up NetBeans in both modes of use.
NetBeans On Raspberry Pi
As NetBeans is a Java program it will work on any machine that supports a Java Virtual Machine JVM and the Pi comes with one already installed as part of Raspbian.
It is assumed that you have your target Pi set up with Raspbian and you either have a monitor, keyboard and mouse connected or you have an SSH connection. If you haven't reached this stage there are lots of introductory tutorials including my own: Real Raspberry Pi - Getting Started And Custom NOOBS
As NetBeans is a fairly demanding program it would have to be a Raspberry Pi 2 or preferably 3.
Getting NetBeans working is fairly simple.
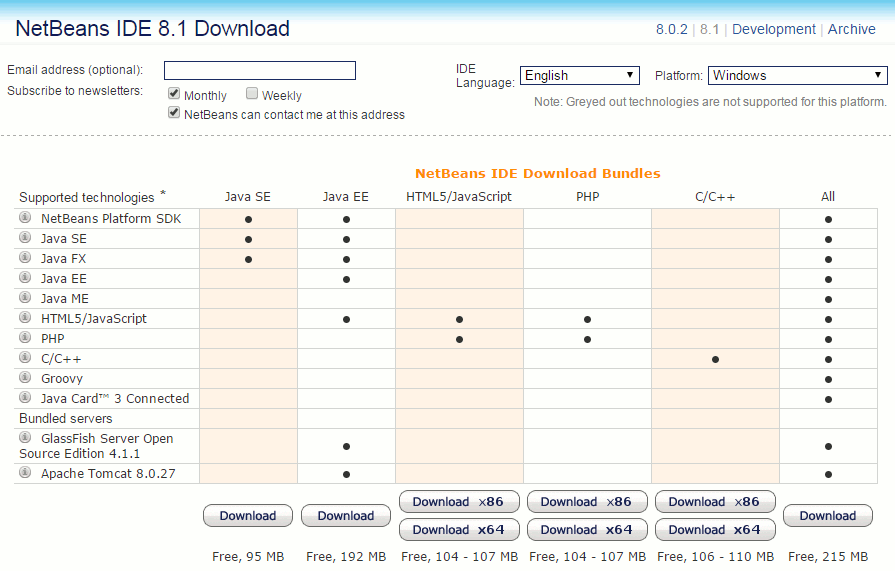
From the desktop first run a browser and navigate to netbeans.org. Find the download page and select: OS Independent Zip and the Language you want.
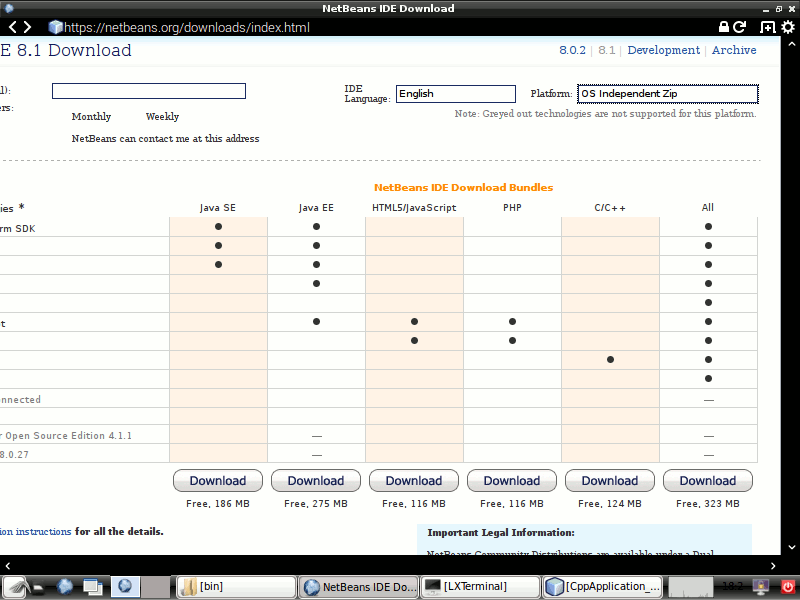
Click the download button of the version of NetBeans you want to work with. I recommend that you select the specific C/C++ version. The download is smaller and you don't get a lot of confusing additional features which have nothing to do with programming in C. You can always add additional language support at a later date.
After the download is complete you have to extract the files in the zip to a suitable directory. If you are the only person going to use NetBeans then your home directory is suitable. Extract all of the files into the directory.
Navigate to you home directory and then to netbeans/bin and run the file netbeans - this is a shell script that the first time it is run installs Netbeans and subsequently runs the IDE. Run it in a terminal, accept the licence agreement and wait while it installs. The other files in the directory are to insall NetBeans on a Windows or OSX machine.
At this point you will have a working NetBeans IDE ready to create your first C program.
Optionally you can add NetBeans to the Programming group in the menu. All you have to do is select Preferences, Main Menu Editor. Then select the Programming group and select New Item. Fill in the dialog that appears as shown:
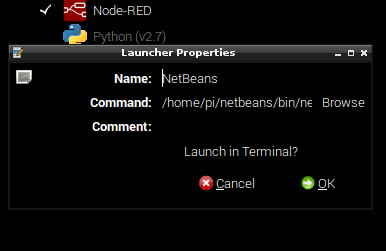
The command is: /home/pi/netbeans/bin/netbeans adjusted to reference your home directory rather than user pi's if necessary.
After this you can run NetBeans from the menu.
NetBeans On A Remote Machine
Although installing NetBeans on Raspberry Pi is easy and it works very well there are good reasons for installing on a desktop machine and using the Pi as a remote build server.
The most obvious advantage is that the desktop machine is likely to be more powerful than even a Pi 3. In addition you can use the same code base and machine to program multiple Pis. All you have to do is change the IP address of the remote build server.
It is assumed that you have your target Pi set up with Raspbian and connected to a network, a wired connection works best because it is faster but a WiFi connection works.
You also need to make an SSH connection to the Pi - you can just make the connection using NetBeans but it is better to use an SSH client such as Putty under Windows.
It is assumed you also know the IP address of the Pi you want to work with.
If you can't make an SSH connection to the Pi then you aren't going to get NetBeans working remotely with it - so check that you can open an SSH terminal.
The first step is to install NetBeans on the desktop machine you want to work with. You can do this by selecting the download that targets the correct OS - Windows, Linux x86/x64 or OS X. Again you can install one of the distributions that supports other languages but there are advantages of simplicity to just using the C/C++ version.
Once downloaded simply run the installer and you should have a fully working version of NetBeans on the desktop machine.
Making the connection between the desktop installation and the Pi acting at the remote build server is described in the next section.
Your First C Pi Program
At this point it is assumed that you have NetBeans installed either on the Pi or on a desktop machine.
It is also assumed that the Pi is correctly setup and, if you are using remote development, it is connected to a network and you know its IP address and can SSH to it.
Before we can start working with C we need to setup the details of where the C compilers are located. The Pi comes ready setup with the GCC compilers as standard and there is no need to do anything at all.
If you are running NetBeans on the Pi then NetBeans will have automatically detected the compilers and set up localhost as the build server.
If you are running NetBeans on a desktop machine then localhost, i.e the desktop machine, will have been setup as the build server, but this is only useful if the necessary compilers have been installed. In the case of Windows this is unlikely unless you have specially installed them.
Remote Build Server
For remote development you have to set up the Pi as the remote Build server. Of course you can skip this step if you are using NetBeans on the Pi itself.
To do this use the menu command:
Window,Services
and drop-down C/C++ Build Hosts ini the window that appears.
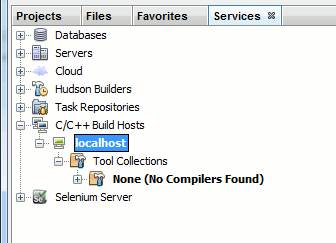
If NetBeans is running on the Pi when you expand the local host entry you'll see all of the compilers and other software needed to compile a C program:
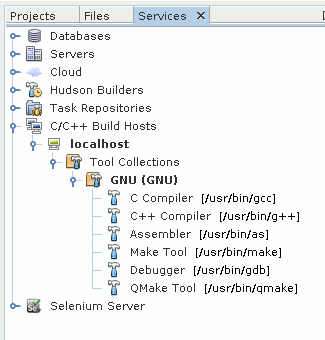
In this case there is nothing more to do.
If you are running NetBeans on a Windows desktop machine then the chances are that under localhost you will see
None(No Compilers Found).
To work remotely we need to add the Pi as a build server. To do this right-click on C/C++ Build Hosts and select Add New Host:
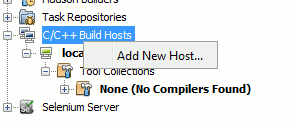
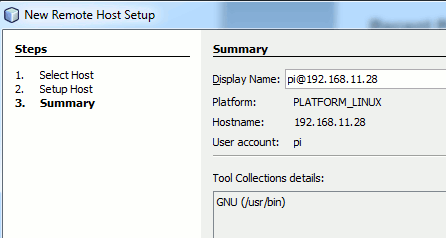
The dialog box that appears lets you set the identity of the build server.
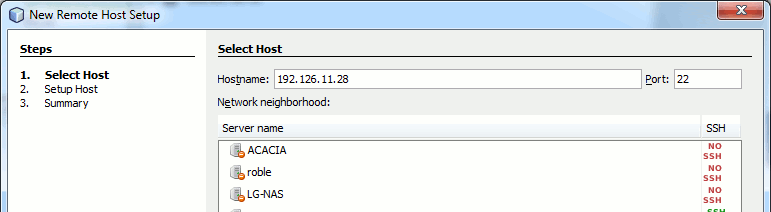
In most cases you will have to supply the IP address of the Pi unless you have set up SAMBA on it. There are advantages to doing this, but not when you are just getting started.
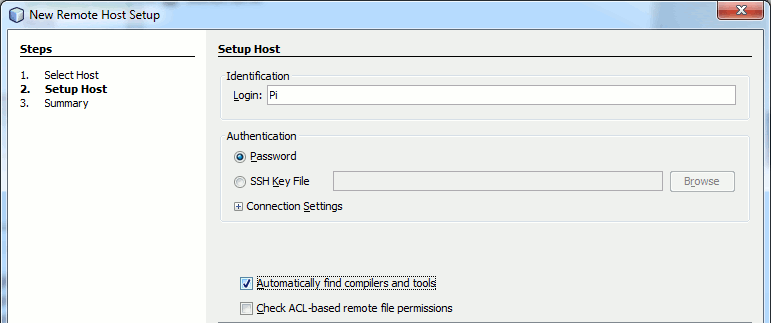
The next dialog box that appears lets you type in a user name and specify how authentication will proceed. You can use a key file, but in the first instance just use a password. You can use the default log in details of user name 'pi' and password 'raspberry'. Notice that these are both case sensitive. You will be asked for the password when you first connect to the Pi. This, of course, is the password that the user you specified needs to log into the Pi. This may seem obvious, but with so many users and passwords involved in setting things up, it can be confusing.
Later on there are advantages to using a user name with root privileges and this will be explained later.
The final dialog box presents you with a summary of what you have set up:
NetBeans should have found the C compiler and linker you are going to use as part of the GNU Collection. In a more general situation you might have to tell NetBeans where the compiler is or select which set of tools you want to use. In the case of the Pi and Rasbian you can leave the defaults as they are.
First Project
Time to write your first C program.
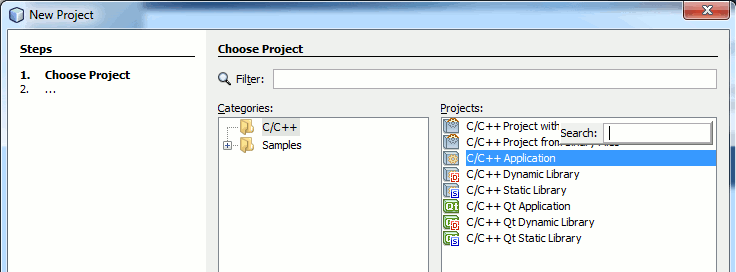
Select File.New Project and select C/C++ Application.
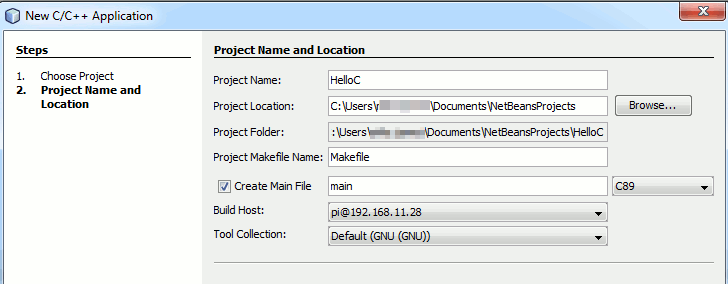
The next dialog box is the one where you customize the project.
You can give the project any name you like HelloC is reasonable for this first example. You need to select the dialect of C you are working in C89 is the most common choice but C99 has the advantage that you can use single line comments //comment and this is worth having and hence this, C99, is what we will be using in the rest of this book.
You can generally leave the rest of the entries at their defaults but if you are working remotely you might have to set the Build host to the Pi you set up as the build host earlier. If you are working with NetBeans on the Pi then the Build Host will be Local Host.
This is really the only difference between the two methods of working in terms of getting things setup but notice that the project files are stored on the local system and copied to the remote system to be built and for testing.
By default NetBeans uses SFTP which will work as long as the SSH connection to the Pi works. Later we will look at an alternative way of setting things up using SAMBA file sharing which has some advantages but is much more complciated to get setup correctly.
NetBeans takes a few seconds to set the project up for you. When it is finished you fill find a C file main.c ready with the start of a program:
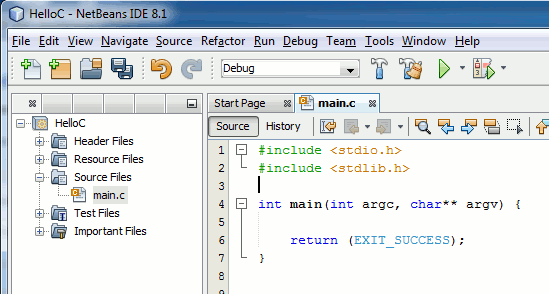
Change the program to read:
#include <stdio.h> #include <stdlib.h>int main(int argc, char** argv) { printf("Hello C World"); return (EXIT_SUCCESS); }
Yes it's a "hello world" program! What more do you need to test the compiler and linker?
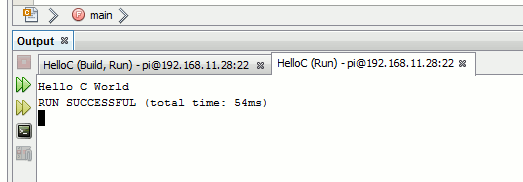
All you have to do now is run the program, either by clicking the green "play" icon or using the menu command Run,Run.
If you look at the Output window at the bottom of the screen you will see messages about how the compile is going. If you are working with the Pi as a remote build host then the files that have changed will be uploaded and then the compiler run using make - more about make in a later chapter.
If you have entered the program correctly it should compile, link and run. If there are any problems you will see error messages in the Output window. You will see the Hello C World message in a new Ouput window tab that opens automatically. The prinf function always sends its output to the Output window and this is very useful for status and debugging messages while you are developing the program.
It is worth knowing where NetBeans stores your project files.
If you are using the Pi or a Linux desktop to run NetBeans then your projects are stored in
/home/username/NetBeansProjects
If you are using a Windows desktop machine to run NetBeans then your projects are stored in NetBeansProjects in your Documents directory and when you run the program the project's files are copied to the Pi to the
/home/username/NetBeansProjects
The two directories on the different machines are kept in sync by the system and sometimes NetBeans will inform you that a file on the Pi has been changed and offers you a chance to copy it back to the desktop machine. In general this isn't necessary because the changes aren't important for editing the project, only running it.
Troubleshooting
Of course, in practice things go wrong.
There isn't much that can go wrong if you are running NetBeans on a Pi. If you have any problems then the best advice is to use a fresh installation of Raspbian and install NetBeans again.
The main things that can go wrong if you are using the Pi as a build host is that it fails to connect. This can be only because you have the IP address wrong, the user name wrong or the password wrong. There is a small probability that you might not have SSH enabled on the Pi but this shouldn't happen unless you explicitly turned it off. Again the best advice is to install a fresh copy of Raspbian.
If you have any trouble connecting make sure you can connect using an SSH terminal such as Putty.
Summary
- C is a very good language to learn for any IoT project. It is fast and efficient and close to the machine. There are lots of other languages that have it as their ancestor, so it is worth learning.
- You can write programs in C using just an editor and the command line compilers, but NetBeans makes it much easier to create and debug programs. It is free to download and is open source.
- There are two ways to use NetBeans with a Raspberry Pi. You can install it on the Pi or you can install it on a desktop machine and use the Pi as the build host.
- There are lots of advantages to using a desktop machine to edit the programs in NetBeans and using the Pi as the build host to compile and run them.
- All you have to do to use the Pi as a build host is to make sure it is correctly set up, know its IP address and be sure that SSH is enabled. You can then set the Pi up as a build host in NetBeans.
- When you create a new project NetBeans creates the files you need to get started in the NetBeansProjects directory, which is either in your home directory on Linux or your Documents directory under Windows.
- When you run your project, NetBeans will first upload the files to the NetBeansProjects folder if you are using a remote build host and use the compilers specified to run the program.
Now On Sale!
You can now buy a print or ebook edition of Raspberry Pi IoT in C from Amazon.
For Errata and Listings Visit: IO Press
This our ebook on using the Raspberry Pi to implement IoT devices using the C programming language. The full contents can be seen below. Notice this is a first draft and a work in progress.
Chapter List
-
Introducing Pi (paper book only)
-
Getting Started With NetBeans In this chapter we look at why C is a good language to work in when you are creating programs for the IoT and how to get started using NetBeans. Of course this is where Hello C World makes an appearance.
-
First Steps With The GPIO
The bcm2835C library is the easiest way to get in touch with the Pi's GPIO lines. In this chapter we take a look at the basic operations involved in using the GPIO lines with an emphasis on output. How fast can you change a GPIO line, how do you generate pulses of a given duration and how can you change multiple lines in sync with each other? -
GPIO The SYSFS Way
There is a Linux-based approach to working with GPIO lines and serial buses that is worth knowing about because it provides an alternative to using the bcm2835 library. Sometimes you need this because you are working in a language for which direct access to memory isn't available. It is also the only way to make interrupts available in a C program. -
Input and Interrupts
There is no doubt that input is more difficult than output. When you need to drive a line high or low you are in command of when it happens but input is in the hands of the outside world. If your program isn't ready to read the input or if it reads it at the wrong time then things just don't work. What is worse is that you have no idea what your program was doing relative to the event you are trying to capture - welcome to the world of input. -
Memory Mapped I/O
The bcm2835 library uses direct memory access to the GPIO and other peripherals. In this chapter we look at how this works. You don't need to know this but if you need to modify the library or access features that the library doesn't expose this is the way to go. -
Near Realtime Linux
You can write real time programs using standard Linux as long as you know how to control scheduling. In fact it turns out to be relatively easy and it enables the Raspberry Pi to do things you might not think it capable of. There are also some surprising differences between the one and quad core Pis that make you think again about real time Linux programming. -
PWM
One way around the problem of getting a fast response from a microcontroller is to move the problem away from the processor. In the case of the Pi's processor there are some builtin devices that can use GPIO lines to implement protocols without the CPU being involved. In this chapter we take a close look at pulse width modulation PWM including, sound, driving LEDs and servos. -
I2C Temperature Measurement
The I2C bus is one of the most useful ways of connecting moderately sophisticated sensors and peripherals to the any processor. The only problem is that it can seem like a nightmare confusion of hardware, low level interaction and high level software. There are few general introductions to the subject because at first sight every I2C device is different, but here we present one. -
A Custom Protocol - The DHT11/22
In this chapter we make use of all of the ideas introduced in earlier chapters to create a raw interface with the low cost DHT11/22 temperature and humidity sensor. It is an exercise in implementing a custom protocol directly in C. -
One Wire Bus Basics
The Raspberry Pi is fast enough to be used to directly interface to 1-Wire bus without the need for drivers. The advantages of programming our own 1-wire bus protocol is that it doesn't depend on the uncertainties of a Linux driver. -
iButtons
If you haven't discovered iButtons then you are going to find of lots of uses for them. At its simples an iButton is an electronic key providing a unique coce stored in its ROM which can be used to unlock or simply record the presence of a particular button. What is good news is that they are easy to interface to a Pi. -
The DS18B20
Using the software developed in previous chapters we show how to connect and use the very popular DS18B20 temperature sensor without the need for external drivers. -
The Multidrop 1-wire bus
Some times it it just easier from the point of view of hardware to connect a set of 1-wire devices to the same GPIO line but this makes the software more complex. Find out how to discover what devices are present on a multi-drop bus and how to select the one you want to work with. -
SPI Bus
The SPI bus can be something of a problem because it doesn't have a well defined standard that every device conforms to. Even so if you only want to work with one specific device it is usually easy to find a configuration that works - as long as you understand what the possibilities are. -
SPI MCP3008/4 AtoD (paper book only)
-
Serial (paper book only)
-
Getting On The Web - After All It Is The IoT (paper book only)
-
WiFi (paper book only)
Related Articles
Real Raspberry Pi - Getting Started And Custom NOOBS